Friday, June 24, 2011

Chicken and Rice Batch Style

I couldn't decide what to do for dinner tonight so I decided to whip up a batch of chicken and rice. It's easy to make and I realized that I could make a huge batch and freeze more meals!

So, I started by putting about 3 lbs of chicken breast in my huge Pampered Chef sauce pan. I threw in 2 chicken bouillon cubes and put the lid on to seal in the moisture and heat.

I know that 2-3 cups of rice makes one meal for my family so I put 16 cups of water in my huge stock pot and 8 cups of rice. If you want to use this recipe, keep in mind that I used the regular long grain rice, not the instant rice. Instant rice you would use 1 cup of water for 1 cup of rice. I put the burner on high and brought my rice to a boil. Once at a boil, I reduced the heat to keep the rice simmering (not boiling over) and set the timer for 15 minutes.

I used frozen chicken breasts so as they thawed, I pulled the breasts out and diced the meat. I didn't do anything fancy. I just wanted the pieces bite sized. To speed up the cutting process I could have used my chopper but I shy away from using my meat in it.

I did use it for the frozen broccoli! My kids always complain about the broccoli being too big and they can't eat it. To avoid having that conversation again I threw the pieces in the chopper and after a few whacks I dumped it in the pot with the cooked chicken. If I had to guess, I'd say I used 3 cups of diced broccoli.

About this time the rice was ready. I poured in 2 cans of cream of mushroom soup. I only added 1 more can's worth of water though. The reason is I like my chicken and rice creamy, not soupy.

After mixing in the cream of mushroom soup, I took the pan of chicken and broccoli and dumped everything in the rice. Even the stock. The bouillon cubes I placed in there while the chicken was cooking added wonderful flavor to the dish.

After more mixing, the meal was ready. I took the whole stock pot to the table to see how much the family actually eats. We ate about a fourth of the pot which meant I had 3 more meals. Yes!

I took a picture of the dinner. I'm looking at my plate and realizing that I forgot a fruit but other than that we had a wonderful, well-rounded meal. The bread is a rosemary and olive foccacia loaf that I traded some lotion for at the farmer's market on Wednesday.

Needless to say, the meal was yummy and I have 3 more in the freezer for another day. Trying to calculate the price per meal was a little tricky for me. The rice was the conundrum. I buy rice in large quantities through my church's provident living program. I cannot remember what I paid the last time I bought rice.

Since you might not have access to this program, I decided to try to find another source for buying a large quantity of rice to give a better idea of the cost per meal. I found one at Amazon.com. Emergency Food Supply, Instant White Rice I use the equivalent of one of these packets in this batch meal so the rice would cost $4.91 to make the 4 dinners.

Hopefully you can find an even better deal somewhere else. I would look on the bottom shelf in the rice area at your local grocery store and see how much the big bags are. Just store the remaining rice in a sealed container and the rice stays good for 20 years or so. Lowes has sturdy paint buckets with lids that seal for around $5.00!

But I digress. In this scenario of buying the rice from the amazon.com resource, my cost per meal is $3.75. It isn't down to $3.00 a meal yet but I also didn't buy anything on sale and I know I paid less for my rice since I didn't have to worry about shipping.

Anywho, happy cooking and let me know if you have any recipes my family should try!

Yard Work a.k.a. Blister Heaven

We worked really hard today. Since I am home and have the time, I've been trying to tame the wilderness that is my parents' yard. They live in a half-acre in Dwight but they both work in Lincoln. They are gone from 7AM to 6PM. They just don't have the time to maintain all the wonderful plants they have. Because of that, everything gets rather over grown.


To make the lawn easier to maintain, I have been working on pulling out weeds, trimming the over-grown bushes, tilling up roots, leveling the soil, laying down landscaping material and putting mulch on top. In the long run this should make it much easier for my parents to maintain each year. I hope I'm right!


Today the kiddos and I went after a big section with severely overgrown plants and lots of weeds. (That's the first three pictures here.) There are several volunteer trees in this section, bushes that should be about 2 feet high overgrown to 4 feet high and tangle weed. Ugh, ugh, ugh!

The kids and I pulled, tugged, clipped, snipped, shoveled and hoed the 15 foot (approximately) section all morning. We were interrupted about 10:30 by the rain but it stopped about 11AM so we went back out. I took 8 wheelbarrows full back to the brush pile. When I say full, I mean piled up as high as will stay on and stuffed down to fit even more. Let's just say we moved a lot of sticks, branches and decomposing leaves from last fall.


The section still looks pretty sorry. The big purple tree on the left butchered. I need to cut the big sticks but they were too big for hand shears. I ran out of steam so I didn't chain saw them down. The tree did a major offshoot behind itself and we'll have to pull out the root stump with the truck.


In the upper right hand quarter of the picture you can see the big volunteer tree with 2 main stems. That puppy isn't going to be fun to remove. I think it should go (sigh) simply because this section of yard really isn't big enough to support a full grown tree. It's roots will damage the sidewalk and the retaining wall in the back if we let it mature.


Under the big tree are what is left of the big bushes with light purple flowers you can see in the second picture. There were actually 6 seperate bushes in the overgrown jungle. I am going to try to talk my mom into moving a few to make laying the landscaping material easier. I also think it will look nicer if they are strategically placed in a row instead of randomly bunched together.


By my count, there are 5 tree stumps that need to be removed. Do you think I can convince the guys to get out the straps and truck to pull them out tonight? I sure hope so. I would like to till, lay the landscaping material and mulch tomorrow. I don't want to give the weeds time to gain a foothold again!


P.S. Yes, I have a big blister on my left hand that popped. Owie!

Mind the Pennies

Part of my goal as a stay at home mom is to teach my children the value of money and hard work. Because of that goal, we do chores around the house and the children earn ten pennies for each chore. That probably doesn't seem like much but keep in mind they are 8, 5 and 3. I'm sure inflation will hit our house hard a few years down the road.


Each child has three different containers. When the children earn 10 pennies, they put 1 in a tithing container, 4 in a spending container and 5 in a savings container. Each Sunday they pull out the pennies in the tithing container and bring it to church.


The spending money they save up for different toys they want. For example, Scotty worked very hard earning a lego set. To his five-year-old brain, it took FOREVER! To a proud momma, he worked hard, volunteered to help and I believe he values the set more than if I had thrown it in the shopping cart and bought it with no effort on his part besides begging.


The savings container is what got my juices bubbling today. I have noticed their savings banks becoming heavier and heavier. I also want to take their understanding and appreciation of saving to the next level. I want them to have savings accounts and every week or two deposit the money from their savings and update a register. What a great learning tool!


I called my bank and asked how much it takes to open a youth savings account. It's $25.00. After adding up what they have in savings, we're not close. I still want them to have a bank account but it will take a while for the five pennies per chore to reach that.


Then I gazed at our penny jar. I was curious how many pennies we had in there. This is the jar that after buying something with cash we throw what's left into the jar. The children and I made lots of stacks of pennies and discovered we had over nine dollars!


Around our house, the children earn the pennies and after doing several chores they can trade in the pennies for silver; a.k.a. nickels, dimes and quarters. Since they trade in regularly (which causes them to practice counting and coin recognition -Yes!), I decided we didn't need over 900 pennies. I took out 8 dollars worth and put the rest back in the penny jar. I realized I was 8 dollars closer to the $75 total we need to open three new accounts.


I got really excited! Instead of just magically making the money appear, what if I could gather up more coins and dollars so the kiddos could see how much money it takes to get to $75.00? I became a woman on a mission. I prowled around the house finding pennies, nickels and quarters. We had coins stashed here and there -pocket change really. Once I pulled them together, we actually have quite a bit! To make a long story shorter, the children had about $15.00 in savings, I have $20.00 from the farmer's market on Wednesday and I was able to gather about $30.00 in loose change! We are only $10.00 short and that I feel I can make magically appear and not lose the point for the children.


A lesson I learned from my last job in Texas was mind the pennies and the dollars will follow. While I felt this was common sense and valuable, the true impact did not sink in until today. We held onto the pennies and they grew into dollars.


How do you mind your pennies?

Tuesday, June 21, 2011

The Wheat Fiasco

I know I am being overly dramatic about the wheat issue. I am simply frustrated because I hate waste. We have seven large drums that we inherited from my husband's parents. We thought they were all full of wheat or beans.

We moved all the drums to Dwight and had to leave them outside in the elements for lack of room. We covered them with a tarp and hoped for the best.

As my husband and I have been working in the yard, we decided to check on things. Even though the wheat was wrapped in plastic, half of the tubs were contaminated and rotting. Fortunately, we were able to salvage 3 barrels. When I purchased the plastic paint buckets for the washing detergent, I picked up extra and we used these to move the good wheat into a water-safe environment and make it small enough to get into the basement.


The other two wheat barrels and garbanzo bean barrel smelled horrible! I have a strong stomach after doing diapers almost non-stop for the last 8 years but this was almost too much for me. We took the barrels out to the leave dump spot in the back yard and pushed the barrels over.

To the left bottom side of this picture you can see some of the grain on the ground as well as the carpet we laid over the top. It smelled so horrible we covered it so our neighbors wouldn't have to suffer.


In the remaining bucket we found these sealed bags. The label reads Mung Beans. Honestly, I had to look those up. I have never cooked with mung beans and I didn't even know what they looked like!

When I'm feeling especially adventurous, I'll try finding a recipe using mung beans and try them out. For now, I added them to food storage.


Monday, June 20, 2011

Cookie Cooking

I was craving cookies and I decided to see how easy or difficult it would be to make some from the batches I stirred up a week ago and froze. As a refresher, I made a quadruple batch of cookie dough, divided it up 8 ways and froze the dough in quart sized freezer bags.

I pulled out a bag and decided to see if the dough would come out without a lot of effort. I turned the bag inside-out and pushed the frozen dough onto the cookie sheet. Easy? Yes.


Luckily, I listened to my mother's advice and flattened the dough when I filled the bags. That made dividing the dough as simple as cutting with a knife. It wasn't hard to cut through the dough either. Easy? Completely.


I spread the dough out then cooked the cookies at 400 degrees for 10 minutes. Since I like my cookies soft, this was the perfect amount of time. If you like your cookies crunchier, add a minute or two to suit your preference.


Overall, the batch cookie experience is a hit. The only change I would make is the cookies didn't spread much so they ended up puffy. Next time I make a big batch of cookie dough I will put less dough in each bag and flatten the dough more. I will end up cutting the pieces bigger which means less cookies. That's fine with me as I end up eating more if there are more around. Less cookies made in each batch equals less cookies I eat!

Chicken Alfredo-ish

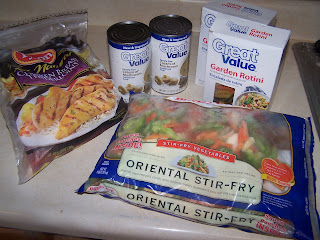
Continuing my batch cooking for freezer meals, I went after a chicken Alfredo effort. I used:

1 bag of chicken tenderloins (they were a good deal),
2 cans of cream of mushroom soup,
2 boxes of Garden Rotini
1/2 bag of frozen vegetables.
2 chicken bouillion cubes

I know that Oriental Stir-fry seems like a weird choice but it worked.


I threw the whole bag in my large Pampered Chef sauce pan on medium heat. I threw in 2 bouillon cubes to add more flavor to the meat and covered the pan to seal in the juices.

I also started a large stock pot of water to cook the pasta. It took a good 10 minutes before the water boiled but the timing was perfect. Cooking a whole bag of frozen chicken takes quite a while.

I added the pasta and let it boil for 9 minutes then strained it off. I tossed olive oil in the pasta to add flavor, prevent the pasta from sticking together and simply because it's so good for you!


By this time, the chicken was thoroughly cooked. I threw all the ingredients in the large stock pot and stirred well. I let the vegetables warm up and served the family dinner.

After dinner, I divided the remaining food into gallon-sized bags. There was enough left over for three more meals!

All the ingredients cost $13.84. Making 4 meals out of the ingredients dropped the price per meal to $3.46! This is much closer to my goal of $3.00 per dinner. Happy dance!

Today's Lesson: Don't Assume

Today, I made a mistake. I make this mistake more often than I like. Unfortunately, I made an assumption. What's worse is it was while baking.

I love my bread maker. It's reliable. If I measure properly it makes delicious loaves of bread and dough. (I learned the hard way that you have to be very exact with bread.) If there's an error, it's a user error.

I am a user and I made an error. I put in the ingredients then set it to dough then went off and did other tasks. I even indulged in a short nap with my youngest. When I wandered back to the kitchen to check on the bread, I noticed that the display read 39 more minutes.

I know that the bread maker has a warming cycle for 1 hour after the bread is complete. I assumed, without thinking about what time the bread went in or whether the warming cycle even has a timer, that the bread was cooked.

I pulled the bread out of the bread maker with 39 minutes left. The color looked too light but I figured the bread usually keeps cooking during the warming cycle and ends up darker. I unplugged the bread maker which cleared the program it was running. I put the bread on the stove and watched the top droop. I decided to pull the loaf out of the baking pan and discovered it was still doughy. Oops!

I couldn't put the bread pan back in the bread maker because the program was cleared when I unplugged the bread machine. There isn't a straight baking cycle. It would have started with the mixing and dough raising which would not work for a half baked loaf of bread.

To salvage the bread, I quickly cut the part-bread/part-dough in half (the loaf in the bread maker is wider than my bread pans) and threw the loaves in the oven for 40 minutes at 350 degrees. You can see that the bread came out rather sad looking. I am pleased to report the bread tastes fine but is a little thicker than the regular loaves. They are more like an Italian loaf than sandwich slices.

I am thrilled that the bread is edible so my mistake wasn't a complete loss. I learned a valuable lesson to avoid assuming where things are in the baking process.

On the bright side, I was able to put the pizza dough in early and had pizza ready to cook when my husband arrived at home after work.

Sunday, June 19, 2011

Meatloaf in mass

I didn't like meatloaf growing up. To be fair, I'm not sure my mom cooked it that often so maybe it was alright but didn't leave a great impression. As an adult, I was blessed to try my mother-in-law's meatloaf and I was hooked!

As I planned what I wanted to try for freezer meals, I figured that meatloaf would be pretty easy. I gathered all my materials and I multiplied by 5 when pulling out ingredients.

The recipe I think is close to what my mother-in-law told me (because I can't find where I wrote it down) is:
1lb hamburger
1 cup oatmeal
1 egg
1TBSP ketchup
1TBSP Worcestershire sauce
miscellaneous vegetables
additional ketchup

I had a 5lb roll of hamburger so I threw the whole thing in the big metal bowl. I took the carrot pulp from the other day and dumped in about a cup. I added 5 eggs, 5 cups of oatmeal, 5 TBSP of ketchup and 5 TBSP of Worcestershire sauce.

For the miscellaneous veggies, I grabbed what I had in the fridge. I always try to keep a couple peppers in the fridge because they are easy to add to any recipe; especially because I have a Pampered Chef Chopper! (Again, Pampered Chef fan here.) My hand cutting consists of slicing the pepper into manageable portions and removing the seeds. Then I pop the top a few times and I have lovely chopped veggies!


Usually I have an onion to throw in my food as well but unfortunately, I didn't have any in the fridge. I bought mushrooms to put in the meatloaf and after chopping those as well, I had everything I needed to start mixing.


Mixing is probably the worst part of the whole process. You can use a spoon but after the cookie dough x 4 experience, I decided to roll my sleeves up and get dirty.


It only took about 3 minutes of mushing before it looked and felt completely mixed together. The egg needs to be spread among all of the meat to help hold the loaf together when you are serving it. If you are worried about germs, the meat is in the oven for an hour. Any germs left over after washing your hands don't stand a chance.

I purchased disposable bread pans just for this experiment. I lined the bread pans with plastic wrap then added the meat on top. After the pan was filled, I wrapped the remaining plastic over the top.


I ended up with 4 loaves. I'm a little disappointed. I thought with 5 lbs we would get 5 loaves but these pans held more than a pound of meat. A good friend of mine suggested that I bulk up my meat further by adding lentils. She said it doesn't change the texture but it does make the meat go further and adds a couple more nutrients. I will try that next time.


I cooked one of them at 375 for 1 hour, added a drizzle of ketchup on top and cooked them for another 15 minutes. If I may say so myself, it was tasty! I added mashed potatoes and fruit to round out the meal.


***Note: Pull the frozen meatloaf out of the freezer the night before and let it thaw in the refrigerator before cooking. If the meatloaf isn't thawed, it will take much longer than 1 hr and 15 minutes to cook.


The ingredients cost $19.22 and made 4 meals. Again, I'm right around $5.00 per meal. Next time, I will buy the meat on sale, add lentils and possibly fill the pans a little less.


I need to do enchilladas in the next couple of days so the meat doesn't sit too much longer. Also, I will be posting about the wheat fiasco soon. (I'm still rolling my eyes.)

Homemade Laundry Detergent

I decided to make homemade laundry soap after seeing a post at Money Saving Mom. When I learned about the prices and how easy it was, I figured I wouldn't be out much if it was a bust and it will save a lot of money in the long run if it works well.

There were a lot of recipes for the washing soap. I chose:

1 bar Fels-Naptha Laundry Soap
1 Cup Borax
1 Cup Washing Soda.

I purchased the Fels-Naptha (.97/bar), Borax (3.74) and Washing Soda (2.77) from Walmart. I purchased 5 bars of the washing soap in hopes that this washing detergent will work for our family. In total, I spent $11.36 on washing ingredients. You can find the ingredients online as well. Amazon has packs of 2 Fels-Naptha Bars for $1.99. The Borax and Washing Soda I could not find for a good deal anywhere on line. Check your local grocery store's laundry aisle. Personally, I had to walk the aisle twice before I spotted the ingredients. Luckily for me, they were stocked next to each other.

I do feel I should note that you do not have to use Fels-Naptha. You can use any bar of soap you have laying around. I chose to use Fels-Naptha because I wanted to stay as true to the recipe as possible as I am trying it out. Another reason to use Fels instead of another bar is to minimize extra ingredients. Some bars of soap have lotion in them. Other bars of soap have strong scents. Since I was making a batch for my parents to try as well, I didn't want additives since my father has sensitive skin.

Finally, I needed something to put the mixture in so I bought a 5 gallon paint bucket and lid from Lowes. Those two were less than $5.00 and I'll be able to reuse it for years. Hopefully, you have one lying around to use.

Once you have the ingredients, you can choose one of two paths. You can make dry laundry soap or liquid soap. Initially, I was going to make dry laundry soap because it is easier to store, takes up less space and is easier to put in the machine. I made a slight error so I changed my plans.

The first step in making homemade laundry soap is to grate the laundry bar. I used my Pampered Chef Mandolin (yes, I'm a Pampered Chef addict) and grated all 5 bars of Fels-Naptha. I do not recommend you try grating more than one bar at a time. My arm was sore for two days afterwards. This is the step that I made the small mistake. My mandolin only has the large grating attachment. To make dry laundry soap, you need to finely grate the bar of soap. I had long strings of soap that were too big for use in a dry washing recipe. So, once I discovered my error, I jumped on the liquid bandwagon!

I grabbed a large saucepan and filled it with approximately 8 cups of water. I then added 1 bar's worth of grated soap and heated it to just under boiling. The picture to the side is near the beginning of the heating process. The soap is clumpy and falling to the bottom.

As the water heats, the soap disperses into the water. Stir regularly to assist the dispersion and prevent any burning. The mixture is done when all the pieces are melted. There will not be any strings or clumps of soap remaining. The water also turned a consistent yellow throughout. Of course, if you do not use Fels-Naptha, the water will turn whatever color of soap you use.

While making the second batch, I discovered why you should not let the mixture boil. It is because boiling makes bubbles. In half a second the mixture was up and over the sides, flooding my oven top. Thank goodness for a range with burners under a glass sheet! This would have been really messy if I had coils.

When the mixture was almost ready, I put the 5 gallon bucket in the sink and started filling. We have poor water pressure (that we will fix in the next couple of years I hope) so it takes a while to fill anything. I poured in 1 cup of Borax and 1 cup of washing soda and stirred as the bucket was filling. By then the soap was completely dissolved so I brought it to the sink and poured it in the bucket as well. I stirred thoroughly then threw the lid on top.

The first batch I filled the bucket to approximately an inch from the rim. The second batch pictured here is the one that boiled over. Not knowing how much I lost to boil-over, I filled the bucket to approximately 2/3 to keep the concentration higher. I figured there isn't anything wrong with using slightly less detergent if it was too potent.

I gave the smaller tub to my parents since they do not do much laundry and the have a high efficiency washer. I told them to use 1/2 cup per load. I have a regular top loading washing machine so I have been using my store bought detergent bottle's measuring cup. I don't fill it to the top so I use between 3/4 and 1 cup per load. I use a little extra because my kids love mud. It never hurts to have a little extra soap to grab onto the dirt and carry it way.

All in all, I feel it was a fun project. We've washed a few loads and so far we don't see or feel a difference in cleanliness from the store bought detergent we were using before. The best part is the savings! I am used to buying cheap detergent for $3.00+ for 64 oz. Now I have 640 oz. that cost me $2.50! I have enough materials to make 3 more batches but I won't need to make any more for 3-6 months. (I haven't figured out how long it will take me to use it all. I am going to check back once it's gone and we'll see how long it took.

I know high efficiency (he) washing machine owners are always worried about using the right detergent. As I was researching different websites to find recipes for laundry detergent, they all mentioned the same thing. You can't use regular washing detergents in a high efficiency washing machine because the detergent creates too many suds. In a high efficiency washer less water is used and they do not rinse away excessive suds. This recipe does not create a lot of suds (unless you boil it) so feel free to try it.

Monday, June 13, 2011

Pulled Pork

Today was my pulled pork adventure. Last night I put the 9 lb bone-in rump roast in the crock pot and I let it simmer on low all night. I chose a rump roast because the website I found the recipe on said to choose a very fatty cut. The meat shreds better if there is a high fat content.

I was nervous leaving the roast on all night because it spent 12 hours cooking and I was worried that the meat would come out dry or over cooked. I threw about a half cup of water into the crock pot just to be sure I didn't completely ruin the meat.

This morning I came down and the fat from the meat had melted and almost filled the crock pot! I'm not sure the water was necessary. I don't know of any way to use the fat so I drained it and threw it away. (My trash man hates me, I'm sure, but he has good reason. I'll have a post elaborating why in the future.) I thought about throwing it outside but the fat would attract vermin. I'm not excited about the idea of attracting possum and field mice to my home. I like guests but not the furry-get-in-my-food-storage kind.

After tossing the fat and juices, I poured the meat onto my large cutting board that I laid across the sink. I didn't want to clean up pork juices for the next week and this way anything that leaked just went into the sink.

When I dumped the meat out, the bone popped out of the roast. I wasn't looking forward to cutting it out so this came as a very happy surprise. I'm not an expert but I assume it is because I let it cook for so long. I didn't throw the bone away. I have neighbors with dogs so I will see if any of them need a new chew toy. (They are outdoor dogs.)

Next, I got to work separating the meat from the remaining fat and shredding the meat. I used two regular dinner forks to manipulate everything. The pork basically fell apart. The fat slid right off and I merely pushed it to the side.

When I was done, I had a huge mound of pork and a small pile of gristle left. Honestly, I was surprised how much meat remained after I was done. There seemed to be more meat after I pulled it apart.

I threw the meat back in the crock pot and it filled to the top! I grabbed one of the 40oz bottles of Sweet Baby Ray's BBQ sauce and dumped the whole thing in the crock pot. After mixing, I realized that 40 oz. wasn't quite enough. I grabbed an open bottle of BBQ sauce from the fridge and poured the rest into the crock pot. Even then, I think the pork could have used a touch more barbecue sauce. I plan on buying three bottles of 40oz Barbecue sauce in the future since the chicken and potatoes from yesterday used one bottle and a little extra and the 9 lb pulled pork takes one and a little extra as well.

I wanted to try the pulled pork today so we had pulled pork sandwiches for lunch. We had carrots and watermelon to round out the meal. Of course, no recipe will please everyone except for pizza but over all, the kids ate. The Sweet Baby Ray's sauce was a hit. It's tasty!

As a tip, I used a pasta spoon to dish out the pork. In case you don't know what I am talking about, it's like a regular serving spoon with slots in the cup area then tines (like fingers) coming up from the sides. It's easier to serve pasta with it and it's also great for grabbing the shredded meat.

After the meat cooled more, I divvied up the rest into quart sized baggies. As I learned yesterday, I marked the bags before I filled them. I dated them just in case one gets lost in the back of the freezer and I find it 3 months from now. Knowing when I made the pork will help me decide if we can still eat it or if I should throw it out. I think the rule of thumb is throw it out after 6 months if it's in an upright freezer and 1 year if it's a chest freezer. If anyone knows for sure, please comment. I have an upright freezer so I will only be planning for 6 months or so of use.

At this point, I have made 5 bags of chicken and potatoes, 7 bags of cookie dough, 25 twice baked potatoes and three bags of pulled pork. I spent $52.51 on the materials for those 13 meals and 7 desserts. That's approximately $4.00 a meal (counting the cost of dessert). After adding miscellaneous fillers to dinners like fruit, vegis and bread, I'm estimating $5.00 a meal. The pork is a big part of what tipped the price per meal up. Also, I didn't shop any deals. After cooking all the meals with the materials and slowly building a reserve, I am going to start shopping only when there is a great deal on meats and other ingredients. My goal is to drop the price per meal to $2-3.00. This will be a challenge but I'm confident I can do it.

I wanted to get to the meat loaf and enchiladas today but I have errands to run. I'm grabbing 5 gallon buckets for the washing machine detergent I am making as well as to transfer some wheat. Tomorrow I'll elaborate on the wheat fiasco.

Sunday, June 12, 2011

Batch Baking Attempt #1

I'm at home now. It's kind of a scary thought really. I'm not sure if my kids will survive but I hear they can flourish on macaroni and cheese and kisses. Well, they will get a lot of kisses but not so much macaroni and cheese. I don't like the stuff.


I was turned on to Money Saving Mom by my awesome friend Lea. Money Saving Mom did a post last week on freezer meals. In essence, you spend half a day baking up bulk amounts of meals or meal makings then freezing it all. The goal is quick, nutritious meals for the busy family and a big money savings by buying large amounts of food. Well, busy family is us with my oldest in baseball and sticking to a budget is now my mantra.


Today I decided to give it a shot. I shopped last night for ingredient to several meals so I pulled some of the supplies out and started cooking. First I grabbed the potatoes. I bought the 10 pound bag of russets. I don't know that there's a difference between Betty Crocker and Idaho potatoes but this is what the local store had.


I wanted to try two experiments with the potatoes. I wanted to get chicken legs and potatoes in barbecue sauce as the base for one meal and on Money Saving Mom there was a suggestion for twice baked potatoes.


I split the bag and put 15 potatoes in the oven to bake at 375 for 1 hour. In hindsight, I should have pulled out the largest potatoes from the bag and used those to bake. My intensive selection process consisted of grabbing the potatoes on the top of the bag and washing them. Not bad for conserving time, but horrible for getting great results. Next time, I will know better and sort by size.


The rest of the bag I chopped up and divided into five -gallon-sized ziplock bags. I then divvied up the drumsticks into each bag. I poured barbecue sauce into each bag, squished the contents around to spread the sauce and sealed them. I chose Sweet Baby Ray's because it was the best deal at the store. I'll let you know if it's good or not in a later post.


Do you notice the bags aren't labeled? Yeah. Don't do that. The contents of the bag caused condensation to form. My Sharpie didn't mark well and writing on an uneven surface was inconvenient at best. Mark your bags BEFORE placing food inside.


I had five bags filled and ready for freezing in about 30 minutes. Since it would have taken me about that long to make one meal, I figure this project was a definite baking success.


When I'm ready to cook these dinners, I'll take the dinner out of the freezer the night before and put it in the fridge to thaw. We usually eat around 5 PM so at 4PM I'll put it in the oven at 400 degrees for 1 hour.


During all of this, I had 4 1/2 cup sticks of butter on the oven softening. I went for the gold and make a quadruple batch of cookies. I mixed the liquids/sugars and realized that I didn't have a big enough bowl. I pulled out the huge metal mixing bowl and stirred the flour in two cups at a time. Did you know that a triple batch takes almost 10 cups of flour? I'm sure you seasoned cookie makers out there are snickering at me. I will not attempt to hand mix a quadruple batch of cookie dough ever again. First, it's not like mixing liquids. There is no smooth movement. It's like trying to stir mud with a stick. Yummy flavored mud of course, but thick and unyielding nonetheless. My hand and arm are rather numb and I'm not looking forward to the ache that will come tomorrow morning.


I didn't add the mix-ins until after I had the dough finished. I split the batter and put 1 bag of Andes mint chips in one half and chocolate toffee chunks into the other. Since I'm not a proponent of cooking dozens of cookies (because I will eat most of them), I divided the dough into four quart bags of each kind. I then made cookies out of one bag to see how many I would get. I made the cookies about golf ball sized (then squished) and I baked two dozen.


I used unsalted real butter and I'm not thrilled with the results. The cookies are more crumbly than I prefer. I'm normally lazy and use vegetable spread like Country Crock and the cookies come out more moist but don't hold their shape well. I will experiment with this more. If anyone knows the perfect butter/spread to try, please let me know!


Once all this was done, the oven was beeping for the baking potatoes. I pulled those out and let them cool while we ate dinner. After dinner was done and we had cleaned up, I cut all the potatoes in half and scooped out the middles. This is where I figure out I should have used the larger potatoes. First, most of the small ones were over cooked. Second, they didn't have much middles to scoop out and third, the skins didn't hold together well. Out of the 15 potatoes I put in the oven, I threw away about 2. I ended up with 25 twice baked potatoes. I'm not sure how these will be consumed yet. They might be a meal but I can see my husband grabbing them individually and zapping them in the microwave for snacks and lunches. I don't consider this experiment as a bomb but I definitely will make sure I get larger potatoes to bake next time.


On the blog post about freezer meals the gal said to use grated carrots in hamburger and to throw in different recipes. She said it bulked up the meat, added nutrients that kids sometimes don't want to consume and I think it can add color to a dull looking meal.


After grating 5 bars of Fels-Naptha for washing machine detergent, I was not in the mood for grating anything else. The geek/gadget lover in me wondered what my juicer would do. I took a bag of carrots and sent them through. At the end of the bag I had a full cup of carrot juice and half a catch container full of pulp.


You probably noticed the orange ice cubes already. (My husband thinks it's weird.) I poured enough juice into the ice cube tray so I could freeze the juice into cubes. My husband and I make a lot of smoothies and I'll use these cubes to add more nutrients to a drink. I scooped the pulp into a quart sized bag and poured the rest of the carrot juice back into the pulp. The pulp sucked it up quickly and the quart bag does not have moisture in the bottom. I will use the pulp in the meatloaves I will make in the next batch baking attempt as well as other dishes I decide to try.


I wanted to get more meals done but I am trying to pace myself so I don't get burned out. At the end of today, I have 5 bags of barbecue chicken and potatoes, 25 twice baked potatoes and 7 bags of cookie dough. I cleaned the crock pot from dinner tonight and put in a pork roast. Following the directions I found on a website, I am going to let it cook over night. Then I'll drain the juices, pull the pork apart, add barbecue sauce then leave it on low for another four hours. I'll let it cool then separate it into quart sized containers. I'm excited to see how many bags I'll get from 9 lbs.