Do you cringe at rebates? I used to as well. To make taking advantage of the mail-in rebate as easy as possible use these steps:
1. Make up a page of adhesive labels with your name, address, city, state and zip on them.
2. Grab a stack of envelopes, slap a postage stamp and half of your return address labels on them and keep them in your purse/briefcase/wallet etc. Keep the other half of the address labels in with the envelopes.
3. After you check out, grab your rebate form from the stacks they have, slap your address label on the rebate form, fill in any extra information they request.
4. Rip off the portion of your receipt with your rebate (at the bottom)
5. Fill out one of the envelopes with the rebate address and place the rebate form and the rebate receipt in the envelope.
6. Seal and drop in the nearest mailbox.
This week for free after rebate
Vaseline Sheer Infusion Lotion 6.8 oz -Limit 6 per household. (I am debating on this one. I make my own lotions but for free I can drop these off at the homeless shelter or something.)
Steel Shelf Bracket 12" -Limit 10 per household.
Shopper's Bag -Limit 10 per household.
There are other great sales but these are the free-bies! Remember, these deals may vary by location. They are also subject to location stock.
Thursday, July 21, 2011
Lotion Bar Tutorial
 What is a lotion bar? It is simply lotion made as a solid.
I love lotion bars. They are nice because they do not require preservatives because there is no water. They are made with beeswax which leaves a protective layer on your skin which means you do not have to re-apply lotion every single time you wash your hands. This is a bonus to me as a mom who cooks a lot. I feel like I am always washing my hands.
This lotion bar recipe is an experiment for me. I have had requests for a lotion bar with no scent or colorant for extra sensitive skin. After more research, I learned olive oil's PH is the closest oil to our natural skin's PH. Because of that, I integrated olive oil in with this batch.
Notice the scale? When working with a range of solids and liquids, it is simpler to weigh everything instead of try to measure. My measurements listed are in pounds and weight ounces. So here's my recipe.
1 lb beeswax
3.5 oz (weighed, 4oz volume)
3.5 oz (weighed, 4oz volume)
5 oz Shea butter
5 oz Cocoa butter
5 oz Mango Butter
You do not have to have several types of butters. Using only shea or mango butter will both make a nice lotion bar. You do need to have a lotion butter in the recipe. You also do not need to use jojoba oil. I simply like it though I might replace it with a different oil for budgetary reasons. Vitamin E Oil, Almond Oil or using all Olive oil will give you nice results.
I drove to Lincoln and visited Valhalla Bees at 47th and Hartley. (They are west of the Dolly Madison store and east of the indoor shooting range.) They had processed some wax and I picked up 3 lbs. I chose pound bricks because it's lower cost per pound and I make big batches at a time. If you want to make a single lotion bar, you can buy the beeswax in ounces if you want.
I also swung by Herbs and More and picked up 4 oz of Jojoba Oil. They charged $9.99 for 4 oz! This is an extremely high price so if anyone finds jojoba oil for less, please let me know where!
 I do not have a dedicated sauce pan big enough for a pound of beeswax so I decided to use the microwave method. When making lotions, do not use your regular cookware. It is really hard to get it completely clean! I recommend grabbing a cheap sauce pan from Walmart or go to a donation store like Goodwill or Salvation Army to get a sauce pan dedicated to making lotions. Or, get a cheep, microwave-safe plastic bowl and dedicate it to making lotions.
I put the pound of wax, oils and butters in the bowl and microwaved for 2 minutes. Then I pulled out and stirred briefly and put the bowl back in the microwave. The picture to the right is after 2 minutes. I set the microwave for another 2 minutes then pulled the bowl out and stirred again. I did this over and over again. Please note, the bowl will get really hot in the bottom. Always tap the bowl lightly where you are going to grab and ensure it is safe to touch or wear protective oven mitts.
 When the wax is almost completely melted, you can pull the bowl out and stir until the rest of the beeswax disappears.
 At this point, the mixture is extremely hot. Make sure to put the bowl on a trivet or hot pad, not your counter. Also, do not touch the mixture as it can cause severe burns.

I have my dedicated mixing spoon and measuring cup in the bowl. I stirred for approximately one minute to make sure all the ingredients are combined. Notice the beautiful amber color. There is no trace of the separate ingredients. If you used bleached wax the color would be almost transparent.
If you wanted to add scent or color, this is the stage to add those. Be sure to use oil soluble colorant with this recipe. You can add regular food color to creme lotions because they contain water. Food color simply pools or makes little balls in oil. (Yes, I found out the hard way!)
 I use regular muffin tins for my molds. There are many molds in a broad variety of shapes and sizes available for you to purchase if you are so inclined. Again, these need to be dedicated to your lotion/craft making. You do not want to use these to make food as it is extremely difficult to get these completely clean and the oils will contaminate your food.
I placed my muffin tin on my scale since I sell my lotion bars. If you notice, there is some wax spillage in between the cups. As the mixture cools, you can scrape the spots off easily and put the pieces back in your still warm mixture.

As the lotion bars cool, they will change to a lighter color. These lotion bars still have a slightly darker center which means they are solid on the outside and still partially liquid in the center. If you touch the tops, they are only warm, no longer hot.
If you want, you can leave the lotion bars out for several hours and let them cool. There isn't a set way to cool them as long as you allow several hours for complete cooling.
Personally, I like to get them out of the muffin tins and wrapped as soon as possible. I let them cool for approximately 30 minutes on the counter then I put them in the freezer. After about 15 minutes in the freezer, I can turn the pan upside down and drop it onto my table and the lotion bars pop out. It sometimes takes a few drops before all of them come out so don't worry if the first drop doesn't work. Getting the bars out is also why I do not fill the muffin tins to the top. The space helps protect the lotion bars from being marred during my "scientific" extraction process.
If you want, you can leave the lotion bars out for several hours and let them cool. There isn't a set way to cool them as long as you allow several hours for complete cooling.
Personally, I like to get them out of the muffin tins and wrapped as soon as possible. I let them
 cool for approximately 30 minutes on the counter then I put them in the freezer. After about 15 minutes in the freezer, I can turn the pan upside down and drop it onto my table and the lotion bars pop out. It sometimes takes a few drops before all of them come out so don't worry if the first drop doesn't work. Getting the bars out is also why I do not fill the muffin tins to the top. The space helps protect the lotion bars from being marred during my "scientific" extraction process.
If you make a large batch like I did, you might have wax left over after filling your molds. As it cools, it will turn hard as well. Do not fear! You can simply put the bowl back in the microwave in 2 minute segments again and fill your molds again once you have emptied them.
The recipe above that I used made 20 lotion bars. I sell my lotion bars for $4.00 each and they last for months. To apply, pick up and rub on your dry skin as if you were using a bar of soap. If your bar is cold, you will need to hold the bar in your hands for a few seconds to warm the mixture enough to melt the beeswax. If the bar is hot, it is really easy to apply too much!
For happy feet, use a salt scrub (also easy to make) to buff off any dirt or dry skin. Then use the lotion bar to seal in the wonderfulness!
Happy lotion making and let me know how your bars turn out!
Saturday, July 9, 2011
Menards Deals
In retrospect, I should have written this post sooner. Menards has some amazing deals for the DIYer and this week they have had a deal where you can buy up to five gallons of paint for $11.00 then fill out a rebate card for $11.00. In other words, free after rebate.
No, you can't have Menards tint the paint. It's part of the "special" HOWEVER, you can buy a pint of paint and tint the gallon -or possibly tint several gallons depending on the color you want for a low price. Personally, I have a quart of paint that I received for free as part of a marketing campain held by a paint company. It is a deep wine red that I can use to tint one of the gallons. We have plans to remodel my parents' downstairs bathroom and the red will look amazing with the woodwork.
Menards also had a rebate for free caulk! I'm a bit of a caulk nut. It solves so many problems like air leaks, water leaks and gaps where creepy-crawlys like to enter. Telling me I can have more caulk for free (even if it's after a rebate) is like telling a choco-holic they get a year's supply of Hershy bars!
These deals are only good until tomorrow. On Monday I'll post any other amazing deals I see.
Taco Heaven
 Today I did my big shopping trip. Super Saver had a weekend sale on 80/20 hamburger meat. Since it was less than $2.00 a pound for a huge roll and I needed a few more items in Lincoln, I could justify making the trip.
While I was at Super Saver I found the huge bottle of taco sauce. I absolutely love this jug! My husband loves making nachos so I figured this would be a win-win situation.
I have hamburgers planned for a meal this week so I went ahead and made hamburger patties and put them in a container. I used about 5 lbs and I have 12 patties that will be ready to cook when we decide to eat them.
I put about 3 lbs of meat in my large Pampered Chef Sauce Pan and browned the meat. Once it was done cooking, I poured the grease out then poured a generaous amount of taco sauce in. We had nachos and afterwards, I put the leftovers in baggies to freeze.

Whoops! I forgot to mark these bags! I grabbed my masking tape and wrote the date and "taco meat" four times. I stuck the tape to the bags and threw them in the freezer.
The taco sauce I will tackle tomorrow. that is a lot of sauce to use so I will divide it up in quarts tomorrow then can it. I'll take photos so you can see how to divvy up a large container of non-meat food.
Now, to figure out how I am going to use the jug . . .
Rhubarb Joy!
 When I made up all the zucchini bread, I saved a loaf to take to the neighbor who gave me the zucchini. I finally remembered to take it to her yesterday and while I was there she asked me if I wanted some rhubarb. Well, of course I did! She even had a print out of ways to use rhubarb that she gave me.
In case you aren't familiar with rhubarb, the plant grows in bushy clumps. It survives the best in cool months. It doesn't do well in southern states but northern states can generally develop a good crop. The rhubarb is immune to most pests and disease which makes it a low maintenance crop. It has a tart flavor in the stalk area which is wonderful for jams and pies. You can actually chew on the stalk like celery if you want. I remember doing so when I was a young girl in my mother's garden.
Pictured you can see the stalks that my neighbor gave to me. I'd like to say that Jasmine's hand is in the picture for reference but really she just wanted her picture taken and this was her sneaky way of getting in all the photos. :)

I took the stalks and trimmed the leaves off the top and cleaned the stalks thoroughly. I know my neighbor doesn't use pesticides on her crops but the stalks had a lot of dirt on them. Once cleaned, you know my favorite method of chopping/getting-the-food-to-manageable-sizes. Yes indeedy, I pulled out my handy-dandy juicer and threw the stalks in.
In hind-sight, I would do things differently if I get more rhubarb. The stalks went through the juicer fast enough but several large chunks popped out of the juicing part and into the pulp catcher. I will throw the stalks in the freezer next time to give them a better solidity before using the juicer. I think I'll be much happier with the results.

As it was, I ended up with a funky-looking mass. I washed my hands and ran my fingers around to catch the big chunks that eluded the juicing process. You can see them on the counter next to the bowl.
One thing I noticed was the mixture was very fiber-y. I wasn't sure how this would effect the results of baking. After looking at several of the recipes from my neighbor, I decided I would try the rhubarb bread.
The recipe is:
1 1/2 Cup Brown Sugar
2/3 Cup Oil
1 Egg
1 Cup Sour Milk (I used regular 2% milk.)
1 tsp Vanilla
2 1/2 Cup Flour
1 tsp Salt
1 tsp Soda
1 1/2 Cup Rhubarb (cut real fine)
Nuts (Optional)
Topping:
1/2 C White Sugar
1 tsp. Cinnamon
1 TBSP Margarine (melted)
Bake at 350 degrees for 1 hour. Makes two small loaves.
 I poured the rhubarb mass into a measuring cup and ta-da! 3 Cups which means a double batch! It's a good thing you weren't in my kitchen to witness the happy dance. It was rather silly. :)
The kids and I measured, poured, stirred and generally had a blast working together again. I picked up a second mini-loaf pan at Walmart this week so I filled up both with the batter and put the remainder into mini-muffin pans.
The mini-loaves I cooked for 20 minutes. The mini-muffins cooked for 10 minutes. For this double batch, I spent about $3.
 00 on all the ingredients and I have 16 mini-loaves and 20 mini-muffins (after we ate our samples).
The only snafu I have right now with these is the taste. They turned out a little bland. I don't know if it is because of the type of rhubarb I used or if I should play with other recipes. I didn't make the topping because it's basically adding pure sugar. I'll whip some up tomorrow and see if it improves the taste.
My neighbor gave me the recipe for rhubarb cobbler. I plan on trying that next time I have rhubarb.
Thursday, July 7, 2011
Freezer Meals Check Up
It has been almost a month since I started making freezer meals. I thought I'd let you how our family is taking it.
For convenience, freezer batch baking gets a B+. I haven't had to worry about what I am going to cook for our meals for weeks. It's already in the freezer and simply needs to be reheated. The ding down to a B is because I have to remember to pull the meal out the night before to defrost in the fridge. I have my fingers crossed that it will become routine for me eventually and this will come up to an A again.
Budget-wise this is definitely an A+! I'm not nearly as tempted to throw the kids in the car and drive to a restaurant for meals. It isn't hard to pull out food and throw it in the oven or microwave so even when I'm tired, I am still willing to cook. Now that I'm looking for great deals on foods on a regular basis and our garden is starting to produce, my cost per meal is dropping.
Nutrition-wise I give batch baking an A as well. Since I am cooking everything myself, I know exactly what is going into my meals. I have control over balancing our diets and integrating blends of ingredients that we like to eat. Also, I have been told by several nutritionists and people in the know that food retains its nutritional value longer when frozen over any other preservation technique.
In the end, I am excited to find more and more recipes and expand my knowledge of foods and home projects.
Wednesday, July 6, 2011
Triple Batch Zucchini Bread
Last fall one of our neighbors brought over a large zucchini. Now, when I say large, I mean a gigantic, on steroids, larger than an eggplant monstrosity! It was so large that I had no clue what to do with it besides cut it up and throw it in the freezer.
Fast forward to this week. On Monday I looked at the bananas in my kitchen and decided it was time to do some banana bread. I opened my trusty Betty Crocker Cookbook: Everything You Need to Know to Cook Today, New Tenth Edition that was a gift a few years back to find the recipe. On the same page was a recipe for Zucchini Bread!
If you've read other posts that I have done, you know that I don't tend to do things small. In fact, I tend to drive my husband crazy because I do not like to do small batches or projects. Because of this particular character trait and another factor, I decided to triple the recipe. Honestly, it was fun!
Just in case you are curious, the Betty Crocker recipe is:
3 cups shredded zucchini
1 2/3 cups sugar
2/3 cup vegetable oil
2 teaspoons vanilla
4 large eggs
3 cups all-purpose or whole wheat flour
2 teaspoons baking soda
1 teaspoon salt
1 teaspoon ground cinnamon
1/2 teaspoon ground cloves
1/2 teaspoon baking powder
1/2 cup coarsely chopped nuts
1/2 cup raisins, if desired
Put your oven rack so the tops of the pans will be in the center of the oven, pre-heat to 350 degrees, grease pans, mix ingredients (zucchini, sugar, oil, vanilla and eggs first) then pour into your pans.
The first step in this process was to prep the zucchini. I detest grating. The idea of grating all the zucchini was a horrible thought. Yet again, I was so grateful I have a juicer! I threw the gallon-sized bag of thawing zucchini in the juicer and in 5 minutes I had the pulp and juice mixed back together and ready to go. It made almost exactly 9 cups.
So I took all the ingredients and multiplied by three. I had my children there and I had them do the math "for" me. It was a nice little teaching moment. Do I get a good-job-momma gold star?
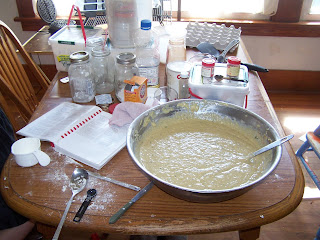 The kids helped me measure all the ingredients, mix the batter and generally make a huge mess. Once we had all the ingredients mixed together I realized that I was going to blog about this so here's the picture of the mess we made. Delightful isn't it?
While I was adding all the ingredients, I decided to use 6 cups of all-purpose flour and 3 cups of whole wheat flour. I have a large amount of wonderful wheat that I want to start integrating into our diet but I am slowly incorporating it to avoid tummy troubles.

I did hit one snafoo when adding ingredients. I could not find ground cloves. I had whole cloves so I pulled them out and looked at them closely. Did you know at the top of a clove there is a little ball? If you grab that in between your index finger and thumb, squeeze and twist slightly, it crumbles. I squeezed and twisted slightly for about 1/2 a teaspoon before I was tired of that option. I went and grabbed nutmeg and added 1 teaspoon to the batter. I think nutmeg and cloves smell similar and it wouldn't be a terrible substitution.
Once my batter was complete, I started filling pans. I didn't want all simple large loaves that you have to cut. I wanted easy to grab zucchini bread. I purchased a snazzy mini-loaf pan a week or two ago that makes 8 small loaves at a time. I also have 2 mini-muffin pans that make 24 muffins at a time. I started baking these suckers up and 2 hours later I had 2 regular loaves, 8 mini-loaves and approximately 100 mini muffins.
 The mini-muffins cooked for 10 minutes, the mini-loaves cooked for 15 minutes and the loaves cooked for 50 minutes in my oven.
In case you are wondering what on earth I would do with so many, I took some to the farmer's market, I gave some away, I will freeze about half of this to pull out later, and I put the rest in the refrigerator. They will last about 2 weeks in the fridge but I'm sure we will eat them within a week.
Tonight while I was in town I went to Walmart and purchased another mini-loaf pan because I like the size they make, I have another gallon bag of frozen zucchini and I have bananas and strawberries waiting to become strawberry-banana bread. (Enough for a triple batch of course!)
For the important part, the cost was minimal. I used zucchini that I received for free from a neighbor, I used almost a whole bag of flour which is $3.00 at the store, I used about 1/4 of a #10 can of sugar which I can get for around $4.00, a dozen eggs which are about $1.25 and other miscellaneous items which total around a dollar. For $6.25 I made a lot of bread and to make it even better, I sold several muffins and received $3.00. All this food for $3.25? This is a GREAT day!
Fast forward to this week. On Monday I looked at the bananas in my kitchen and decided it was time to do some banana bread. I opened my trusty Betty Crocker Cookbook: Everything You Need to Know to Cook Today, New Tenth Edition
If you've read other posts that I have done, you know that I don't tend to do things small. In fact, I tend to drive my husband crazy because I do not like to do small batches or projects. Because of this particular character trait and another factor, I decided to triple the recipe. Honestly, it was fun!
Just in case you are curious, the Betty Crocker recipe is:
3 cups shredded zucchini
1 2/3 cups sugar
2/3 cup vegetable oil
2 teaspoons vanilla
4 large eggs
3 cups all-purpose or whole wheat flour
2 teaspoons baking soda
1 teaspoon salt
1 teaspoon ground cinnamon
1/2 teaspoon ground cloves
1/2 teaspoon baking powder
1/2 cup coarsely chopped nuts
1/2 cup raisins, if desired
Put your oven rack so the tops of the pans will be in the center of the oven, pre-heat to 350 degrees, grease pans, mix ingredients (zucchini, sugar, oil, vanilla and eggs first) then pour into your pans.
The first step in this process was to prep the zucchini. I detest grating. The idea of grating all the zucchini was a horrible thought. Yet again, I was so grateful I have a juicer! I threw the gallon-sized bag of thawing zucchini in the juicer and in 5 minutes I had the pulp and juice mixed back together and ready to go. It made almost exactly 9 cups.
So I took all the ingredients and multiplied by three. I had my children there and I had them do the math "for" me. It was a nice little teaching moment. Do I get a good-job-momma gold star?
 The kids helped me measure all the ingredients, mix the batter and generally make a huge mess. Once we had all the ingredients mixed together I realized that I was going to blog about this so here's the picture of the mess we made. Delightful isn't it?
While I was adding all the ingredients, I decided to use 6 cups of all-purpose flour and 3 cups of whole wheat flour. I have a large amount of wonderful wheat that I want to start integrating into our diet but I am slowly incorporating it to avoid tummy troubles.
I did hit one snafoo when adding ingredients. I could not find ground cloves. I had whole cloves so I pulled them out and looked at them closely. Did you know at the top of a clove there is a little ball? If you grab that in between your index finger and thumb, squeeze and twist slightly, it crumbles. I squeezed and twisted slightly for about 1/2 a teaspoon before I was tired of that option. I went and grabbed nutmeg and added 1 teaspoon to the batter. I think nutmeg and cloves smell similar and it wouldn't be a terrible substitution.
Once my batter was complete, I started filling pans. I didn't want all simple large loaves that you have to cut. I wanted easy to grab zucchini bread. I purchased a snazzy mini-loaf pan a week or two ago that makes 8 small loaves at a time. I also have 2 mini-muffin pans that make 24 muffins at a time. I started baking these suckers up and 2 hours later I had 2 regular loaves, 8 mini-loaves and approximately 100 mini muffins.
 The mini-muffins cooked for 10 minutes, the mini-loaves cooked for 15 minutes and the loaves cooked for 50 minutes in my oven.
In case you are wondering what on earth I would do with so many, I took some to the farmer's market, I gave some away, I will freeze about half of this to pull out later, and I put the rest in the refrigerator. They will last about 2 weeks in the fridge but I'm sure we will eat them within a week.
Tonight while I was in town I went to Walmart and purchased another mini-loaf pan because I like the size they make, I have another gallon bag of frozen zucchini and I have bananas and strawberries waiting to become strawberry-banana bread. (Enough for a triple batch of course!)
For the important part, the cost was minimal. I used zucchini that I received for free from a neighbor, I used almost a whole bag of flour which is $3.00 at the store, I used about 1/4 of a #10 can of sugar which I can get for around $4.00, a dozen eggs which are about $1.25 and other miscellaneous items which total around a dollar. For $6.25 I made a lot of bread and to make it even better, I sold several muffins and received $3.00. All this food for $3.25? This is a GREAT day!
Tuesday, July 5, 2011
Make Your Own Liquid Soap
I just discovered this post on Savvy Housekeeping.
"How To Turn A Bar of Soap Into Liquid Hand Soap
Ingredients:
1 c soap flakes
10 c water
1 Tbs glycerin
Equipment:
Cheese grater
A large pot
Measuring cup and spoons
A spatula for stirring
A soap container with a hand pump
A container to hold excess soap
Funnel
Directions:
First, grate the soap. Get out your cheese grater, grab the soap, and get grating. I found this to be surprisingly easy, although the soap particles tend to float in the air as you grate. You can wear a mask to avoid breathing it in. When you’re done, the soap flakes look like grated Parmesan:
One bar of soap yielded a little over 1.5 cups of flakes. The recipe only uses one cup of soap flakes, so I put the remaining soap in a jar for later use.
In a large pot, combine 1 cup soap flakes, 10 cups water, and 1 Tbs glycerin. Turn on medium-low heat and stir until the soap dissolves. This happens fast, about a minute or two.
Let the soap cool completely, then pour into the containers using the funnel. That’s all there is to it!"
From Sabrina: I am going to try this possibly tommorrow. Wednesdays are the farmer's market so it will depend on whether I get everything ready in a reasonable amount of time or not. I have some glycerin soap base that I haven't done anything with so I'll melt it down and try making it liquid which we use a lot more than bar soap.
If you have the urge to be adventurous and try this check out the comments on the Savvy Housekeeping blog before you try just to have a heads up of some issues others have experienced. Remember, every bar of soap will have different ingredients. The type you choose will affect the amount of water and glycerin you should use. If your batch doesn't come out perfect the first time, keep trying. If it is too thick, add a cup of water. If it is too runny, boil off a little bit of the water. I recommend letting it boil for 10 minutes then sit overnight to congeal. If that's not enough, boil for 10 more minutes.
Yard Project
 I have been working hard in my parents' yard and I am finally starting to see some progress. Out of curiosity, I decided to measure the garden by the road to see how far I needed to go. This garden is 150 feet! No wonder I am so tired today!
My mother decided she didn't want the regular bricks along the sidewalk so she bought scalloped bricks to line the sidewalk. I think it adds a nice touch.
Yesterday, everyone chipped in and pulled weeds, tilled, leveled the soil, carted the extra soil to the strawberry bed, laid landscaping material and mulch.
The problem we are running into is all the tree stumps. Because the garden grew without maintenance for so long, several volunteer trees were able to take root. We have dug up or pulled out (using a truck) 9 trees so far.

To add a little bit of fancy to the garden, my mom had this old log from a tree cut down years ago. We grabbed it and put it on the mulch then added the large rocks to add a little extra to it. It fills the space nicely and gives the eye a break when viewing the garden.
The strawberry bed turned out very nice as well. We laid regular rectangle bricks for the base and for leveling then arranged landscaping bricks on the top. We did
 the bricks a few weeks ago but yesterday we finally moved enough soil to fill the garden to the top. By the way, the white metal behind the stump is an old headboard. We officially have a "bed" of strawberries. Hee hee hee.
I have spent an hour or more working in every weekday for the last three weeks. My parents have spent 2-3 hours each Saturday working on it as well. If we had paid someone to do all this work, we would have spent at least $500.00 on labor already. Yes, I'm tired. Yes, it is hot, hard labor but we get the satisfaction of looking at the garden and knowing we accomplished something. We also save the hundreds of dollars to spend on food, a trip or something else that comes up. (Not to mention I'm losing my extra weight!)
Some Stores Help You Budget
I've been meaning to post for a while about a discovery I made recently. As I have been working on freezer meals and saving money on food, I lamented how I don't receive the paper and thus I cannot shop deals. On a whim I decided to look for my local stores on line. Jackpot!
In my area there is Super Saver (a B&R Store), Walmart, Hy-Vee, Sunmart and several smaller stores. Unfortunately, the closest store is 10 miles away and a small convenience store and very over-priced. The next closest store is Walmart, 20 miles away so popping over to pick up a small item is prohibitive. The next closest store is Super Saver at 30 miles away but where I would prefer to shop.
For those in the Lincoln and Omaha areas, http://www.super-saver.com/ has the local weekly ads posted online. The best part is if you click on a food item in the ad, it saves it to a shopping list which you can print out when you are done looking at the ad. That is definitely user friendly!
After looking over the ad for the week, I don't see anything that I need for my family or any deals I can't pass up. Now that I know that, I can save myself 4 gallons of gas and skip a trip towing 3 kids. Definitely a win!
After checking out Super Saver, I ventured on over to http://www.hy-vee.com/. Sometimes you can find really good deals at Hy-Vee but generally they charge more. It never hurts to look and if there's a great deal on something, I can print out the page and take it to Walmart where they price match.
To see what deals Walmart has each week, they also post their deals online at http://www.walmart.com/. Unfortunately, my local store has no ads this week.
For those of you close to a CVS or Walgreens, you definitely want to subscribe to Money Saving Mom. She posts a list of deals, coupons you can clip or print out and the bonuses you get for buying each item. For this week, she has a list posted here: http://moneysavingmom.com/2011/07/cvs-deals-for-the-week-of-july-3-9-2011.html. At CVS you can stock up on health and beauty supplies and pay a fourth to half of what you would pay otherwise.
The power at CVS is their Extra Care Bucks program. When you purchase certain items you get a coupon with your receipt for savings on your next purchases. When you plan each week, you match up deals with coupons online and in the paper which reduces the cost per item to the prices at Walmart then you receive a coupon for money off the next shopping trip. When I lived in Lubbock, I planned each week and spent about $25.00 per week on $70 worth of products. When you are a regular shopper, you also build up quarterly bonuses. I received a coupon for an extra $20.00 free at one point.
Because I did that regularly, I purchased enough supplies to last us through most of this next year and I paid around a dollar or less for each item: Toothpaste, floss, shampoo, conditioner, razors, etc.
My advice, for what it's worth, is go find out if your local stores have their deals online. Spending 10 minutes reading can save you a shopping trip and some hard earned coin!
Subscribe to:
Posts (Atom)